【应用安全】如何用NGINX实现ModSecurity WAF
世界上几乎有三分之一的网站使用NGINX web服务器,而且这个数字还在不断增长。越来越多的组织选择NGINX作为web服务器的原因很简单。它提供了良好的性能,并且是轻量级的,但同时也很健壮。
Web应用程序防火墙(WAF)
什么是web应用程序防火墙?它与网络防火墙有何不同?网络防火墙根据预先确定的规则监视和控制传入和传出的网络流量。通常,对于网络防火墙来说,恶意请求或攻击看起来就像正常的流量。有一些下一代网络防火墙是应用程序感知的,但它们是基础设施堆栈的一部分,而不是应用程序堆栈。web应用程序防火墙将作为应用程序堆栈的一部分来防止应用程序级别的攻击。随着应用程序的开发和测试,WAF策略和规则将成为流程的一部分,并与堆栈一起部署。作为第7层或HTTP层安全性的一部分,WAF将检查HTTP通信,并根据规则发出警报、记录或阻止请求。
何时使用WAF?
- 合规要求。
- 为开发团队提供缓冲。如果发现了任何漏洞,可以立即在WAF级别减轻这些漏洞,而开发团队可以更改代码并修补问题。
ModSecurity是什么?
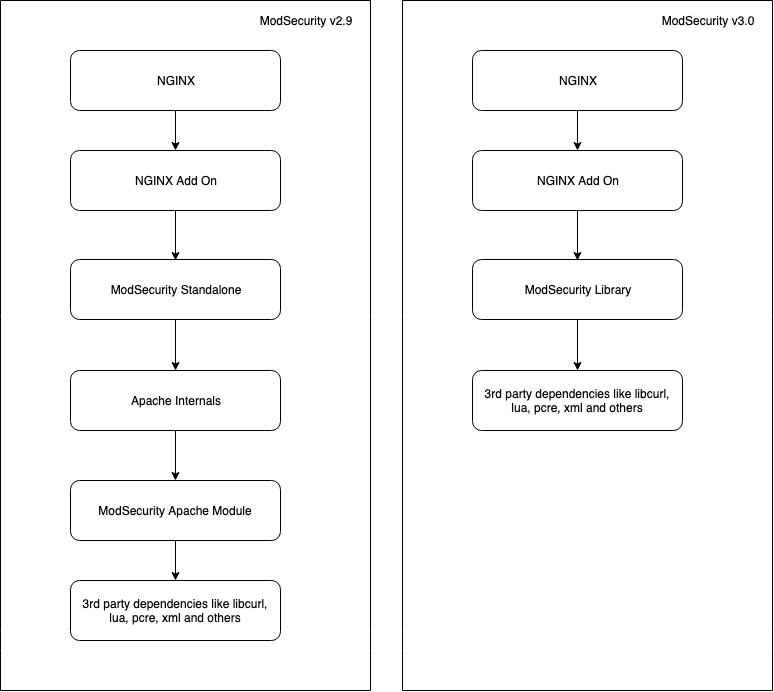
这是在2002年作为Apache模块由唯一作者RistićApache开发的。大约在2012年,这个模块的许可被改变了,这允许为NGINX和IIS等服务器开发模块。ModSecurity module已经存在一段时间了,现在已经发布了不同的版本。与旧版本相比,最新版本(在撰写本文时)v3具有相当大的性能提升。它也可以作为动态模块使用,这意味着您不需要再次使用该模块编译NGINX,而只需编译该模块并将其插入web服务器即可。
安装ModSecurity v3
我们将深入研究使用Amazon Linux在AWS EC2上安装此模块的细节。本博客假设您已经安装并运行了NGINX,并且对NGINX配置文件有基本的了解。
注意:NGINX版本1.11.5或更高版本是必需的。
先决条件的包
如果您在服务器上从早期的源代码编译了NGINX,那么所有的包可能都已经在服务器上了。
yum install gcc make automake curl curl-devel httpd-devel autoconf libtool pcre pcre-devel libxml2 libxml2-devel
从源代码编译ModSecurity v3模块
代码编译分为两部分。编译ModSecurity代码作为NGINX的一个动态模块。将动态模块链接到正在运行的web服务器的连接器的编译。由于ModSecurity项目的模块化特性,要将其插入不同的服务器,只需为该服务器编译相应的连接器。据我所知,NGINX、Apache和IIS都有独立的连接器。
ModSecurity编译代码
$ git clone --depth 1 -b v3/master --single-branch https://github.com/SpiderLabs/ModSecurity$ cd ModSecurity
$ git submodule init
$ git submodule update
$ ./build.sh
$ ./configure
$ make
$ make installDuring the process of installation it is safe to ignore the below message.
fatal: No names found, cannot describe anything.Depending on the machine the compilation should be complete in about 12-15 mins.
为NGINX编译ModSecurity连接器作为一个动态模块
$ git clone --depth 1 https://github.com/SpiderLabs/ModSecurity-nginx.git
虽然只有动态模块将被编译完整的源代码Nginx需要编译模块。
确定安装了哪个版本的Nginx,以及来自官方站点的特定版本的源代码。
$ nginx -v
nginx version: nginx/1.14.1Get the source code
$ wget http://nginx.org/download/nginx-1.14.1.tar.gz
$ tar -xvzmf nginx-1.14.1.tar.gz
现在我们已经有了所有的代码,让我们编译模块。编译这个模块有一个陷阱。模块应该使用与编译服务器上的nginx相同的参数编译。您将能够使用nginx -V命令列出所有初始配置参数。
$ cd nginx-1.14.1.tar.gz
$ ./configure <original configuration here> --add-dynamic-module=../ModSecurity-nginx
$ make modules
$ cp objs/ngx_http_modsecurity_module.so /etc/nginx/modules
在上面的编译中有几点需要注意。
- 如果依赖项不可用,可以从原始配置中删除——with-xxxxx-module=dynamic选项。
- 复制共享对象(.so)文件时,需要确保将其复制到服务器上正确的文件夹。上面命令中提到的路径是通用位置,但是这可能会根据服务器配置而改变。
在Nginx中加载ModSecurity动态模块
将以下load_module指令添加到/etc/nginx/nginx.conf文件的顶层配置文件。它指示NGINX在加载配置时加载ModSecurity动态模块。
load_module modules/ngx_http_modsecurity_module.so

如果在加载模块时遇到一个错误,大致是“未能从:unicode加载定位unicode映射文件”。你可以遵循这个思路。基本上,您需要做的是复制这个文件到/etc/nginx/modsec/unicode.mapping
ModSecurity配置模块
有一个单独的文件夹可以保存所有modSecurity配置文件,这样更干净。这里,我们将使用ModSecurity项目当前维护者TrustWave SpiderLabs提供的配置文件标准推荐。
$ mkdir /etc/nginx/modsec
$ wget -P /etc/nginx/modsec/ https://raw.githubusercontent.com/SpiderLabs/ModSecurity/v3/master/mods…
$ mv /etc/nginx/modsec/modsecurity.conf-recommended /etc/nginx/modsec/modsecurity.conf
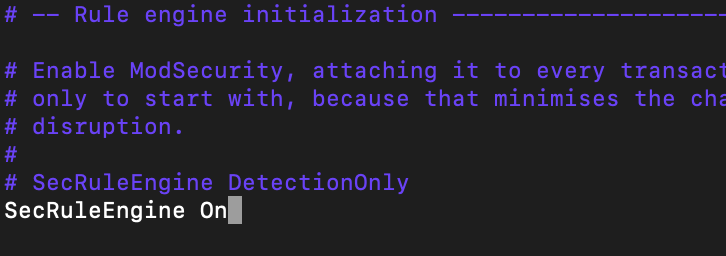
默认情况下,该文件中的配置设置为DetectionOnly,这意味着将检测并记录恶意请求,但不会删除这些请求。将指令更改为主动删除请求。我建议对登台实例执行此操作,并在应用程序运行于任何生产实例之前对其进行测试。
配置引擎以主动删除恶意请求。
出于本博客的目的,我们将配置几个简单的规则。将以下文本放入/etc/nginx/modsec/main.conf:
Include "/etc/nginx/modsec/modsecurity.conf"
# Basic test rule
SecRule ARGS:blogtest "@contains test" "id:1111,deny,status:403"
SecRule REQUEST_URI "@beginsWith /admin" "phase:2,t:lowercase,id:2222,deny,msg:'block admin'"
规则1说,如果有一个名为“blogtest”的查询参数,其中包含一个值“test”,则删除请求。
规则2说,如果有一个URI以admin开头,则删除请求。
在生产环境中,您可能希望有更好的规则来防止恶意请求。OWASP核心规则集可能是一个很好的起点。
使ModSecurity模块
到目前为止,我们所做的就是安装模块,让NGINX加载它,并为模块设置一些配置。这并不意味着您所配置的服务器现在将开始使用这些配置。我们需要通过添加以下两个指令来为我们想要覆盖的主机启用这个模块:
server {
# Other server directives here
modsecurity on;
modsecurity_rules_file /etc/nginx/modsec/main.conf;
}
不需要为服务器上的所有位置启用此模块。您还可以有一个配置,其中说只能在某些路径上启用,而不能在其他路径上启用。我不确定您为什么要这样做,但这实际上取决于您的用例。
server {
    listen 443;
    # modsecurity on; # All traffic over 443 have ModSec on

    location / {
       proxy_pass http://127.0.0.1:8080;
       modsecurity off; # ModSec off by default
    }    location /waf {
       proxy_pass http://127.0.0.1:8080;
       modsecurity on;
       modsecurity_rules_file /etc/nginx/modsec/main.conf;
       error_log /var/log/nginx/waf.log;
    }
}
测试配置
让我们运行一些curl请求来测试前面创建的简单规则。
$ curl http://localhost/adminaccess
<html>
<head><title>403 Forbidden</title></head>
<body bgcolor="white">
<center><h1>403 Forbidden</h1></center>
<hr><center>nginx/1.14.1</center>
</body>
</html>$ curl http://localhost/admin-login
<html>
<head><title>403 Forbidden</title></head>
<body bgcolor="white">
<center><h1>403 Forbidden</h1></center>
<hr><center>nginx/1.14.1</center>
</body>
</html>$ curl https://localhost?blogtest=thisistestparam
<html>
<head><title>403 Forbidden</title></head>
<body bgcolor="white">
<center><h1>403 Forbidden</h1></center>
<hr><center>nginx/1.14.1</center>
</body>
</html>

正在记录请求及其被删除的原因。
结论
没有足够的安全。不同层次的安全比单一层次的安全在更大程度上减轻了威胁。Web应用程序防火墙是抵御恶意攻击的最后一道防线。ModSecurity是一个开源项目,它与NGINX无缝结合,并且能够应用OWASP核心规则集。这是开始保护应用程序的好地方。
原文:https://medium.com/building-goalwise/how-to-implement-modsecurity-waf-with-nginx-15fdd42fa3
本文:
讨论:请加入知识星球或者小红圈【首席架构师圈】
- 157 次浏览